 gives you access to create, edit,
or delete announcements.
gives you access to create, edit,
or delete announcements. The Announcements icon
gives you access to create, edit,
or delete announcements.
To create new announcements (when security settings allow):
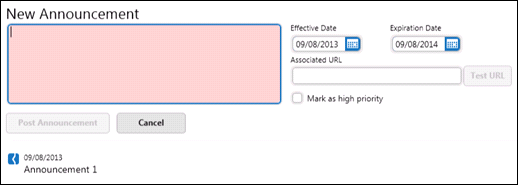
Click
on the Show announcements icon
in the upper tool bar.
Click (add/edit).
Enter the announcement in the New Announcement field.
Enter the Effective and Expiration dates by typing in or selecting from the calendar.
Type or paste a link into the Associated URL field if desired. The URL may be tested by clicking Test URL.
If the announcement is of high priority, check the Mark as high priority box.
Click Post Announcement
To edit existing announcements (when security settings allow):
Click on the Show announcements
icon
in the upper tool bar.
Click (add/edit).
On the actions menu  ,
click Edit Announcement.
,
click Edit Announcement.
Edit the announcement, URL, priority level, effective or expiration dates requiring change.
Click Post Announcements. A Saved confirmation appears.
To delete existing announcements (when security settings allow):
Click on the Show Announcements
icon
in the upper tool bar.
Click (add/edit).
From
the actions menu of the applicable announcement,
click Delete Announcement.
Click Yes to confirm the deletion or No to cancel.